Top Tips for Capturing Aurora Australis Moments
Updated: Aug 26
The Aurora Australis, or Southern Lights, is one of nature's most breathtaking spectacles. This mesmerizing display of colorful lights dancing across the night sky captivates photographers and travelers alike. Capturing this ethereal phenomenon requires not just the right equipment but also knowledge of the best practices to ensure you get stunning images. In this blog post, we will explore essential tips for photographing the Aurora Australis, from selecting the right location to mastering your camera settings.
Understanding the Aurora Australis
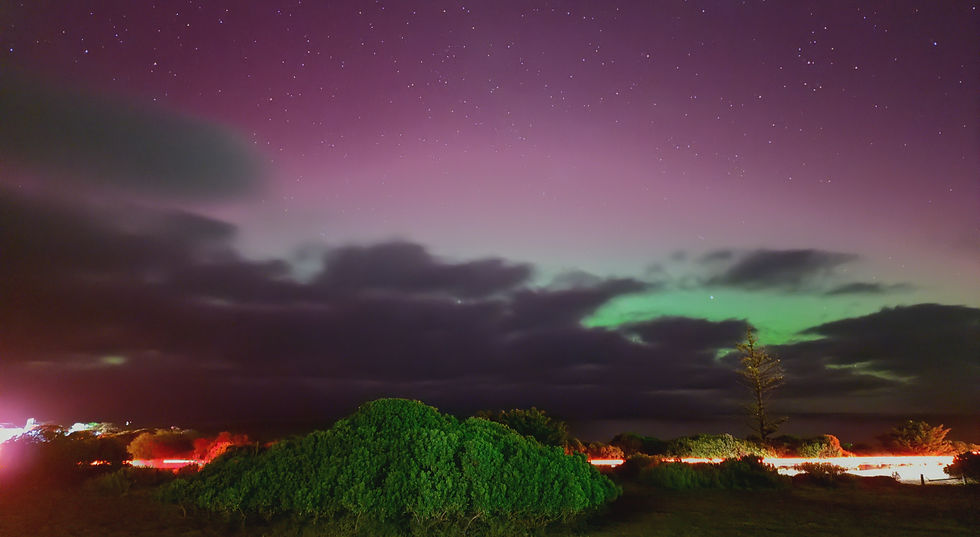
Before diving into the technical aspects of photography, it’s essential to understand what the Aurora Australis is. This natural light display occurs when charged particles from the sun collide with gases in the Earth's atmosphere. These collisions produce beautiful colors, primarily green, pink, and purple, which can vary in intensity and shape.
Best Locations to View the Aurora Australis
Choosing the right location is crucial for capturing the Aurora Australis. Here are some of the top spots around South Australia known for their stunning displays:
Tasmania: Places like Goat Bluff, Clifton Beach and Calvert's Beach offers excellent viewing conditions, plus there are a variety of tours.
Victoria: Places like Phillip Island, Cape Schanck, and Point Lonsdale make it one of the best places in the Victoria to see the Southern Lights.
Western Australia: Elevated places between Perth and Albany are great locations for viewing the Southern lights.
Kangaroo Island: With its unique landscapes and proximity to dark skies, Kangaroo Island offer favorite among photographers.
South East of South Australia: Known for its clear skies and minimal light pollution, locations like Port MacDonnell, Cape Northumberland are prime locations for aurora viewing.
Victor Harbour: Places like Kings beach near Encounter Bay are perfect locations for viewing the aurora.
Adelaide, Surrounding Suburbs: Although Adelaide is higher up, We still get to see some of the bigger auroras that happen.
Timing Your Photography Session
The Aurora Australis is most visible during the winter months when nights are longest and skies are darkest. Here are some tips for timing your photography sessions:
Check the Forecast: Websites and apps that track solar activity can help you predict when the auroras will be visible. Look for KP index ratings of 5 or higher for the best chances.
Choose the Right Time: The best time to photograph the auroras is usually between 10 PM and 2 AM. This is when the lights are most active.
Be Patient: Sometimes, the auroras may take time to appear. Bring warm clothing and be prepared to wait for the perfect moment.
Essential Camera Equipment
To capture the beauty of the Aurora Australis, having the right camera equipment is vital. Here’s what you need:
Camera: A DSLR or mirrorless camera is ideal for night photography. These cameras allow for manual settings and interchangeable lenses.
Lens: A wide-angle lens (f/2.8 or faster) is recommended to capture more of the sky. Look for lenses with a focal length of 14mm to 24mm.
Tripod: A sturdy tripod is essential for long exposure shots. It keeps your camera stable and prevents blurriness.
Remote Shutter Release: This tool allows you to take photos without touching the camera, reducing the risk of camera shake.
Latest phones: Most phones are capable of taking photos of the aurora, you will need a tripod for this.
Camera Settings for Aurora Photography
Getting your camera settings right is crucial for capturing the Southern Lights. Here are some recommended settings:
ISO: Start with an ISO of 800 to 1600. You may need to adjust this based on the brightness of the auroras.
Aperture: Use the widest aperture available (f/2.8 or lower) to let in as much light as possible.
Shutter Speed: A shutter speed of 5 to 30 seconds is typically ideal. Longer exposures can create beautiful trails of light, while shorter ones capture more detail.
Focus: Manually focus your lens to infinity. Autofocus may struggle in low light conditions.
Composition Techniques
Once you have your equipment and settings ready, it’s time to think about composition. Here are some tips to enhance your aurora photography:
Foreground Interest: Include elements in the foreground, such as trees, mountains, or buildings, to add depth to your images.
Rule of Thirds: Use the rule of thirds to create a balanced composition. Place the horizon either in the lower third or upper third of the frame.
Leading Lines: Use natural lines, such as rivers or paths, to lead the viewer’s eye towards the auroras.
Post-Processing Tips
After capturing your images, post-processing can enhance their beauty. Here are some tips for editing your aurora photos:
Adjust Exposure: Increase the exposure slightly if your images appear too dark.
Enhance Colors: Use saturation and vibrance adjustments to make the colors of the auroras pop.
Sharpening: Apply a small amount of sharpening to bring out details in the auroras and foreground elements.
Safety Considerations
While chasing the Southern Lights can be exhilarating, safety should always come first. Here are some safety tips to keep in mind:
Dress Warmly: Wear layers to stay warm in winter's night temperatures. Don’t forget gloves and a hat.
Stay Aware of Your Surroundings: Be cautious of your environment, especially if you are in remote areas. Avoid steep cliffs or unstable ground.
Travel in Groups: If possible, travel with others. This not only enhances the experience but also ensures safety.
Conclusion
Capturing the Aurora Australis is a rewarding experience that requires preparation, patience, and the right techniques. By understanding the science behind the lights, choosing the best locations, and mastering your camera settings, you can create stunning photographs that showcase this natural wonder. Remember to enjoy the moment and take in the beauty of the night sky. Happy shooting!
Comments